Understanding How a Water Softener Fits Into Your Home’s Plumbing System
When you start thinking about how to install a water softener, it’s easy to get lost in the maze of pipes, valves, and fittings. The whole process might look intimidating — like trying to assemble furniture without the manual. But once you understand how the system connects to your plumbing and how water moves through it, the whole picture begins to make sense. Let’s take a relaxed walk through the essentials of how a water softener installation works, why the diagrams matter, and what’s really going on behind the scenes when your tap water goes from hard to soft.
Getting the Big Picture
At its core, a water softener is a simple piece of technology doing a very practical job: it removes hardness minerals — mainly calcium and magnesium — from your household water supply. These are the culprits that leave behind those chalky white stains on your faucets, spots on your dishes, and buildup inside your pipes.
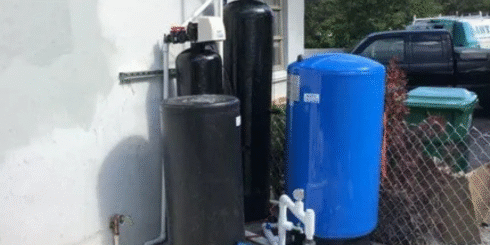
Before diving into the technical bits, it’s helpful to visualize what’s happening. A residential water softener installation diagram usually shows three main components: the mineral tank, the brine tank, and the control valve. The mineral tank holds resin beads that capture hardness ions. The brine tank stores saltwater, which regenerates those beads after they’ve done their job. And the control valve? Think of it as the brain — directing the flow of water, deciding when to clean the resin, and making sure everything runs smoothly.
Once you can picture that setup, the process feels far less mysterious.
The Flow of Water: A Step-by-Step Story
Water from the main supply line first passes through a shut-off valve, so you can control the flow when doing maintenance. Then it hits a bypass valve — a clever piece that lets you route water around the softener when you don’t need soft water (like for outdoor hoses).
After that, it enters the mineral tank. Here, the resin beads do their magic, swapping the hardness minerals for sodium or potassium ions. What comes out is beautifully soft water — gentle on your skin, kind to your appliances, and free from the minerals that cause scaling.
You might find a plumbing water softener diagram especially useful here. It visually maps how the pipes connect between the main supply, the softener, and the rest of your home. These diagrams show you exactly where the bypass sits, how the drain connects to the brine tank, and where the softened water reenters your house plumbing. Once you see it drawn out, the system feels far more approachable, even if you’ve never done plumbing work before.
Where People Often Get Confused
The tricky part usually comes when homeowners try to match the drawing with what’s actually in their utility room. Every home’s plumbing layout is different — older homes might have copper pipes running in odd directions, while newer ones use PEX tubing that looks more flexible and colorful.
That’s why most professional installers or DIY guides recommend using a water softener installation diagram as a reference, not a strict rulebook. The principle is the same everywhere: get the hard water into the softener, route it out as softened water, and ensure a safe drain for regeneration. But the physical layout — elbows, T-joints, fittings — may vary depending on your home’s architecture and plumbing design.
If you’re ever in doubt, remember: the arrows on the diagram are your best friends. They show direction, not design.
A Quick Word on Regeneration
Water softeners aren’t one-and-done systems. They need to regenerate regularly — usually every few days — to clean the resin beads so they can keep doing their job. This is when the system pulls salty water from the brine tank and flushes it through the mineral tank to reset the resin.
A good installation setup makes regeneration automatic. The control head handles timing, the brine line manages flow, and the drain line safely disposes of the waste. As long as you keep the salt level up, the cycle repeats like clockwork. It’s low-maintenance, and that’s what makes it appealing for busy households.
DIY vs. Professional Installation
If you’re a confident DIYer, you can handle the basics: cutting pipes, installing fittings, sealing connections, and making sure there’s no backflow. But if plumbing feels like another language to you, there’s no shame in calling a professional.
A certified installer ensures proper pressure regulation, bypass setup, and compliance with local plumbing codes. They also pressure-test everything before turning the water back on — something most first-time installers forget to do.
Even if you do it yourself, it’s smart to have a pro check your setup once it’s running. A single misaligned valve or loose drain line can cause unnecessary headaches later.
The Hidden Benefits of a Well-Planned Setup
The right installation doesn’t just make your water soft — it makes your whole system efficient. You’ll notice your water heater works better, your laundry feels softer, your glassware sparkles more, and your appliances last longer.
It’s not just about comfort; it’s about longevity. A well-installed softener is an investment that quietly pays for itself over time. And when you actually understand how the water flows, you’re far more confident maintaining it — topping up salt, checking pressure, or replacing parts when needed.
Wrapping It All Up
Understanding your home’s water softener setup is like learning the layout of your favorite hiking trail — once you know the twists and turns, you stop worrying about getting lost. Whether you’re studying a detailed residential installation plan, reviewing a plumbing layout, or simply trying to see where everything connects, the goal is the same: clarity.
Water softeners aren’t complicated once you break them down piece by piece. Every valve, line, and connection has a purpose. And with the right diagram and a bit of patience, you can make sense of it all. So next time you’re staring at your water system wondering where to start — grab that diagram, trace the flow, and remember that every drop of softened water started with a little understanding.
Because the real magic of soft water doesn’t begin in the tank — it starts when you finally see how everything fits together.